Monday, September 29, 2008

Experimenting with bacon

Bacon...mmmmmmmmmmmmm.

It's hard to find someone who hates bacon, unless of course that someone is vegan. I love it, and my wife enjoys it too, although she prefers to limit her intake of this fatty protein.

I saw a review of different bacon cooking techniques on Cooking For Engineers, so I decided to try a method I've never used before--baking at a low temperature for a long time. Babysitting the oven for 3 hours wasn't really my idea of fun, however. Cooking while I sleep seemed to be a better option. I arranged the bacon nicely on a rack that night, popped it in the oven, and set the oven timer to go on at 200°F, 3 hours before it was time to wake up.

I woke up to the delicious smell of bacon. When I tried it, I found it very crispy with a purity of flavor that comes from not having been charred. The pieces were perfectly straight, with minimal curling at the edges. This is the way my wife likes her bacon. I prefer mine slightly charred on the edges, with a bit of softness to balance the crunch, but this method is certainly a nice way to have your bacon, and eat it too.

Wednesday, August 6, 2008

Really simple bruschetta

It's heirloom tomato season! This is very exciting for me because some of my favorite simple dishes become much better with heirloom tomatoes. It's time for bruschetta, caprese, and panzanella (bread salad). Even my old Chinese home cooking staple, tomato and egg, is better with heirloom tomatoes.

First, allow me to give a lesson on pronunciation. Italians pronounce "ch" as a "k" sound. So to properly pronounce bruschetta, it should be sounded out as "broo-skeh'-ta". It's not pronounced "broo-sheh'-ta" like everyone in America says. As for the definition of bruschetta? It's a toasted bread with olive oil and garlic.

Anyway, heirloom tomatoes can be really expensive, up to $5 / lb at Whole Foods and Safeway. Don't buy them there! To save money, go to your local farmer's market. On one visit to my local farmer's market, it was $3 / lb. My coworker was able to find some for 75 cents / lb at her farmer's market! What a deal! She was kind enough to buy some for me.

My wife wanted to eat something simple, so I thought of bruschetta. It seems like most of these simple tomato recipes call for a combination of the same ingredients: tomatoes, bread, basil, mozzarella, olive oil, garlic, salt, and pepper. It's crazy the number of dishes you can make with just those ingredients!

Anyway, I promised it would be simple, so here you go!

Heirloom Tomato Bruschetta
1 baguette (wife is partial to Acme...), sliced
2 medium sized heirloom tomatoes, small dice
10 leaves basil, chiffonade (thinly sliced into ribbons)
1 clove garlic, sliced in half
extra virgin olive oil
salt (preferably sea salt--I like Maldon)
  1. Brush olive oil onto bread slices.
  2. Toast bread in a toaster oven until golden brown and delicious.
  3. Rub the cut half of a garlic clove on the toast.
  4. Sprinkle some salt lightly on the bread, set aside.
  5. In a mixing bowl, combine tomatoes, basil, some olive oil, and salt.
  6. Spoon the tomato mixture on the toasted bread slices, and serve immediately.

Tuesday, June 17, 2008

Cooking for my sister in law

I recently had the pleasure of cooking for my wife and her sister, who came over to visit. I decided to make pork loin, and found a recipe for Pork Tenderloin with Apricot Fennel Ragout from the Martha Stewart Living 2002 Annual Recipes book. One thing that I like about Martha Stewart's recipes is that they have been tested and are generally foolproof. They are made for the average homemaker who doesn't necessarily know all the fanciest French techniques. Consequently, you can assume cooking times and portion sizes have a fairly wide margin of error.

I took some liberties with the original recipe. Instead of using 2 pork tenderloins, I used one, and I only used one type of mustard (Dijon) instead of the two. It was still delicious. I've posted the modified version below.

Putting the crust on the pork

Trust me, it's 145°F. You don't want pork to be well done!

Reducing the sauce.

The finished product!

Wine pairing. We had this with a 2005 Hogue Cellars Chardonnay, which was a great deal at BevMo for $11 (plus 5 cents more for a second bottle). The wine was a good match: slightly buttery, a little oaky, and medium bodied with refreshing acidity through the finish to cut through the richness of the pork and the sauce.

Pork Tenderloin with Apricot Fennel Ragout

5 tbsp Dijon mustard
1 16 oz pork tenderloin
salt and pepper
1/2 cup bread crumbs
3 tbsp vegetable oil
1 tbsp unsalted butter

4 large shallots, large dice
1 small fennel bulb, sliced thinly
1 1/2 cups homemade chicken stock
12 dried apricots
1/4 cup brandy
1 tsp fresh thyme

1. Preheat the oven to 400°F. Season the pork with salt and pepper, rub with mustard. Coat the pork with bread crumbs. Set aside.
2. Heat a large skillet over medium-high heat. Add 2 tbsp oil and sear the pork on all sides until brown. Remove from pan; set aside. Add the remaining tablespoon oil and butter to the pan. Add the shallots and fennel. Cook until tender, about 5 minutes. Add 1/2 cup stock; cook, stirring, until the liquid evaporates, 1 to 2 minutes.
3. Return the pork to the pan; add the apricots, 1/2 cup stock, and brandy. Roast in the oven, stirring the vegtables occasionally, until the internal temperature of the pork reaches 145°F, about 20 min. (Yes, it is safe and delicious that way!)
4. Transfer the pork to a cutting board; place the pan over medium-low heat. Add remaining 1/2 cup stock and thyme; stir with a wooden spoon to loosen any browned bits on the pan. Simmer 5 minutes. Season with salt and pepper; slice the pork. Serve with sauce.

Tuesday, April 15, 2008

Quickfire Challenge: Shrimp Chips

My wife gave me a challenge the other day: cook something without going to the grocery store, using at least one ingredient from the pantry.

I stared at the pantry for a long time and couldn't figure out anything, so we watched an episode of Top Chef for inspiration. I had my "Eureka!" moment when I found a bag of Shrimp Chips, the delicious snack I grew up eating, to the bewilderment of my Caucasian friends.

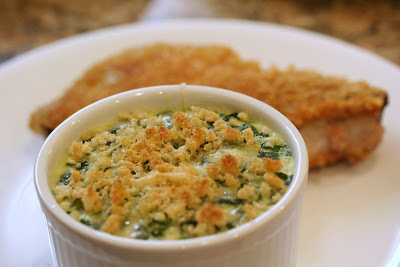
We had frozen pork chops in the freezer, so I was going to use them to make Shrimp Chip crusted Pork Chops. For a second dish, I was thinking something along the lines of a savory custard. That way I could take advantage of leftover frozen spinach and the eggs we usually keep in the refrigerator. I didn't have the pie crust necessary to make a quiche, so I used a ramekin instead. I also didn't want to wait forever for it to bake, so I chose to steam the custard instead (a decision that turned out poorly, as you will find out).

I took out a mallet and hammered away at the shrimp chips inside a plastic bag until they became crumbs. Afterwards, it was simply a matter of dipping the chops into flour, then an egg wash, and then the shrimp chip crumbs, before placing them into a shallow pool of oil to fry. They came out golden brown and delicious. I'm sure the extra MSG in the shrimp chips didn't hurt, either.


The custard was not so tasty. I steamed the custard mixture (mixture of an equal portion of eggs and milk, plus a handful of frozen spinach) until it set, which did not take much time at all. I then topped it with some more shrimp chips and placed it under the broiler for a minute until it browned. The result? A crispy top, but an unfortunately watery inside. Oh well, the chops made up for it.

Lemon curd

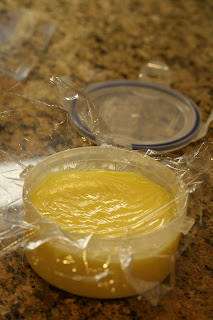
My wife likes anything with lemon in it. Lemon tarts, lemon meringue pie, key lime pie--okay not exactly a lemon, but it's close. We had some extra Meyer lemons that were on the verge of going bad, so she asked me to make lemon curd.

When I first heard about lemon curd, I thought it sounded gross. Isn't curd the stuff that coagulates in milk and becomes cheese? Anyway, I used Alice Waters's recipe a few months ago, and it turned out great. I decided to use it again this time, but I think I kept it over the heat too long. The result was something that wasn't as silky smooth as the first time. The flavor seemed a bit too sweet, also. I may have reduced the sugar last time without remembering it.

Once your curd is done, use it as a spread for anything from English muffins to scones.

Lemon Curd
2 eggs
3 egg yolks
2 tbsp milk
1/3 cup sugar
1/2 cup lemon juice (about 2-4 lemons)
6 tbsp butter, cut into small pieces
1/4 tsp salt (unless butter is salted)
zest of one lemon
  1. Combine eggs, egg yolks, milk, sugar, salt, and beat until incorporated.
  2. Stir in lemon juice and zest.
  3. Add butter one at a time until incorporated.
  4. Cook the mixture (I like to use a double boiler) until it is thick enough to coat a spoon.
  5. When thick, pour into a container, cover with plastic wrap touching the curd, and refrigerate. (The plastic wrap prevents a film from forming on top.)

Sunday, April 6, 2008

Chinese dumplings

I had extra pork left over from making meatloaf, so I put it to good use by making some Chinese dumplings. Growing up, I remember dumpling making as a family ritual where the whole family would get together and socialize around the table, making dumplings. As a kid, I never participated in that, but I still think about the social aspect of it. In any case, family now means "my wife and I", so we had a fun time making these dumplings and eating them later!

I used this recipe from Rasa Malaysia. I didn't make the wrappers from scratch (bought them at the Chinese supermarket), but I followed the recipe for the filling. I thought the filling was a bit dry, but that's probably because my pork was too lean. I also thought the "1/8 teaspoon salt" seemed negligible, as were the measurements for some of the other ingredients. Five drops of sesame oil isn't going to do much to the flavor of 1/2 lb of ground pork. Next time, I will follow my instinct with the measurements of the flavoring ingredients.

Detailed wrapping instructions follow for those who have never done it before.

1. Place the wrapper in the palm of your hand and drop a small portion of the meat in the center.

2. Using the tip of your finger, wet the edges of the wrapper.

3. Pinch the ends together.

4. Do the first pleat.

5. Repeat the pleats on both sides and make sure the entire dumpling is pinched tight. You're finished!

Tuesday, March 25, 2008

Everlasting milk

I hate milk.

There, I said it. I never liked milk, but as is common wisdom, milk gave you strong bones and made you tall. When I was in elementary school, the teachers in the cafeteria wouldn't let me leave until they had given my milk carton a good shake and there was nothing left inside. I would try to confuse them by filling up the carton with random garbage. My loving parents, in hopes that I would grow strong and tall, made me drink milk every morning. I kept up this routine until college, when I made my own decisions about what to eat in the morning (which was usually nothing, out of laziness).

When I started cooking, I learned that there were many dishes that require milk. Milk was everywhere, in béchamel, custards, mashed potatoes, all kinds of dishes. I didn't mind it in its other forms, but cooking with milk usually meant buying a carton at the supermarket, using it once, and letting the rest go to waste because it spoiled.

I kept up this pattern until recently, when I discovered aseptic milk. Aseptic milk, such as Horizon Organic, does not require refrigeration, and is in convenient 8 oz packages to minimize waste. Now, I know it doesn't taste exactly the same as refrigerated milk, but hey, I'm cooking with it, not drinking it. It sure beats the flavor of powdered milk. The best part is that I hardly waste milk anymore, and I no longer have to go to the grocery store whenever I encounter a recipe calling for milk. I buy it in bulk (from Whole Foods) and store it in the pantry. What a wonderful invention!

Friday, March 21, 2008

Comfort food: meatloaf

Growing up, my dad would do a lot of the cooking, and one thing I would always look forward to was his meatloaf. I would eat it with Worcestershire sauce and/or ketchup, and it was usually served with some kind of potato and salad. It was a fun break from the usual Chinese food we had growing up.

My wife felt like eating meatloaf this week, so I dug up an old email sent to me from my dad with the recipe. The perfect thing to eat it with was, of course, the mashed potatoes from my previous post!

It tasted just like at home--except the TV wasn't on in the background this time.


Meatloaf
2 lbs ground beef, replacing up to 1 lb with ground pork if desired (and don't use the lean stuff!)
1 egg
1 carrot, grated
1 stalk celery, small dice
1 onion, small dice
1 granny smith apple, small dice
1 cup Quaker's 3-minute oatmeal
ground pepper, to taste
several healthy pinches of salt
1 tbsp soy sauce and/or Worcestershire sauce
  1. Preheat oven to 350°F
  2. Mix all ingredients together
  3. Line a loaf pan with aluminum foil or parchment if you're lazy like me and don't want to clean up afterward
  4. Bake at 350°F for 1½ hours. The top should be a deep brown color.
  5. Let it rest for 10 minutes.
  6. Enjoy!

Sunday, March 16, 2008

Joël Robuchon's pommes purée

...aka the best mashed potatoes EVER!

After eating at L'Atelier de Joël Robuchon in Vegas, I was inspired to try to recreate his famous pommes purée. Somehow "mashed potatoes" doesn't sound right given the level to which Robuchon has taken this dish. I found his recipe, along with quite a bit of discussion, on the eGullet forums. Two pieces of equipment were important to the recipe: a ricer and a tamis. I had never used any of these, nor did I own them.

One of my wife's bosses surprised her by giving us a ricer! We were very excited. For those who don't know what a ricer is, it's basically a device that squeezes on the food and forces it through small holes about the size of a grain of rice, hence the name. It is more efficient and produces a more even result than using a potato masher.

The second piece of equipment, the tamis, is even more obscure. It's a flat bottomed sieve with a rim around it (kinda like a Chinese steamer), so that when you push food through the sieve, it comes out very smooth. I didn't have one, nor was I going to go out and find one, so I decided to try using a regular sieve.
The recipe is intense: 2 lbs of potatoes (about 3 russets), and 2 sticks of butter! I ended up using 1.5 sticks in an attempt to be "healthier" (who am I kidding?). I followed the recipe as best I could, and it was quite a workout. I was sweating by the time I was done whipping the milk into the puree, but man was it worth it. It was delicious.

Trying to push the mashed potatoes through my sieve did not happen very easily. I gave up after trying a few minutes. The stuff that did go through the sieve, however, had taken the puree to a whole new level of refinement. The texture was so smooth, even, creamy, and luxurious. No wonder they only give you a small portion at the restaurant--it's quite a bit of work!

Next time I try this, I will use truffle salt, which I'm sure will be awesome. I will also boil the potatoes a little longer and a little slower, as I feel they were still a bit undercooked in the center. Next Thanksgiving, I'm going to volunteer to make a big batch of this!

Pommes Purée
2 lbs russet potatoes
8 oz butter (I used 6 oz)
3/4 to 1 1/4 cups milk brought to a boil and kept hot
sea salt to taste
  1. Starting with cold water, boil unpeeled potatoes until a fork inserted meets barely any resistance (may take 30 min or more)
  2. Peel potatoes while still hot (the potatoes are incredibly easy to peel at this point)
  3. Push the potatoes through a ricer into a pot and stir over very low heat until steam no longer escapes (about 5 minutes)
  4. Add butter by vigorously stirring potatoes until incorporated
  5. Add 3/4 cup milk in a slow stream while vigorously whipping potatoes, incorporating air into the mixture
  6. Add salt, more milk as necessary, until desired taste and texture
  7. For that extra level of refinement, pass through a tamis

Monday, March 10, 2008

Lamb and grits

During one of our trips to Costco, my wife spotted a package of lamb chops and decided she wanted lamb for dinner. No problem, I thought. Lamb chops sound fancy but it can be cooked simply with salt and pepper on a cast iron skillet for a quick meal.

Now that we had the protein, I pondered what to do about starch. The only bread we had was sandwich slices, and that didn't seem very good. I didn't really want to eat it with rice, either, since it seemed too boring. I decided a nice creamy polenta would work best. Once I got home though, I realized I didn't have any polenta. Crap. Hmmm...what about grits? It's the same thing, except a different color, right? What the heck, I decided to do it. Add some sauteed veggies on the side and we were set.

For the grits, I just followed the directions on the back of the box, substituting 1 cup of milk instead of water. I also added some leftover white wine from a previous meal. I wanted it to be a little richer, so I added butter. To give it some flavor, I added a handful of dried thyme and black pepper, to taste.

For the lamb, I simply seasoned it with salt and pepper, and cooked it on a cast iron grill over medium-high heat. This gave it a nice seared outside while keeping the meat done at medium.

Grits
1 cup grits
1 cup milk
2 cups water
splash of dry white wine (optional)
1 tsp butter
thyme, to taste (maybe 1 tbsp)
pepper, to taste
salt, to taste
  1. Bring water, milk, and wine to boil
  2. Add grits, thyme, salt and pepper
  3. Simmer, stirring occasionally, until thick (about 5 minutes)
  4. Add more water until desired consistency is reached
  5. Add butter
  6. Adjust seasoning to taste
Lamb chops
lamb chops
salt
pepper
dry white wine (optional)
oil
  1. Season lamb chops with salt and pepper
  2. Heat oil in a cast iron skillet on medium-high heat
  3. In batches, sear both sides of the lamb, cooking a few minutes per side until desired doneness
  4. Remove lamb chops.
  5. Deglaze with white wine, reduce by half, and pour over chops.

Saturday, March 1, 2008

A Tale of Two Fondues

Sorry for not posting in a while. My wife and I were in Vegas, where we shared an awesome meal at L'Atelier de Joël Robuchon. I also recently fell sick to the flu, but fortunately it happened after our trip to Vegas or else I wouldn't have been able to taste anything!

Nonetheless, I had the chance to try two fondue recipes for a get-together we had for our friend's birthday! There were 13 people over--a whole lot of cheese. We don't actually own a fondue set, so we borrowed a friend's alcohol burner, and we made use of a Chinese electric hot pot.

The two recipes we tried were Alton Brown's recipe from an episode of Good Eats, and the other was based on the more traditional Swiss recipe. One of the nice things about using a hot pot instead of a fondue set is that the hot pot is bigger and can accommodate more people than your standard fondue set. This worked out well and there was plenty of room for people to reach in and dip their food.

In addition to pieces of bread, we also served broccoli, chicken/apple sausages, potato wedges, roasted bell peppers, and sauteed mushrooms. It was a success! I must say, however, that I enjoyed the Swiss recipe much more than Alton Brown's. I am a big fan of AB, but the fondue had kind of a lumpy texture, and I didn't enjoy the flavor of the smoked Gouda. The Swiss recipe had an even texture and a more subtle flavor that worked better with the variety of ingredients we were using.

Wednesday, February 20, 2008

Eggplant, pork, and what the heck is cornflour?

Continuing with the Japanese cuisine, I made two dishes on Monday: Ginger-stewed Eggplant, and Gingery Seared Pork. The theme ingredient, by sheer coincidence--ginger!

Both of these recipes called for ginger juice. Ginger juice? How do you get juice out of a ginger? It turns out, if you peel and then grate the ginger, you can squeeze the "shavings" to get ginger juice. I liked the result. In the past, when I wanted some ginger flavor, I would cut up a few pieces and hope it would infuse the dish, but it was more like ginger "surprise" rather than an infusion. I may use this technique in future Chinese dishes.

The eggplant prep was also interesting, as it called for making many shallow diagonal slits on the skin. It seems to have helped make it easier to eat, as well as help the eggplant to more readily absorb the flavor of the broth.

Although the pork recipe calls for marinating the meat for at least 20 minutes, I felt like it could have been longer. The ginger flavor was not as concentrated as I would have liked, and I suspect it would have been better with one hour of marinating.

For dessert, my wife requested this recipe for grapefruit soufflé. Let me tell you, I'm not trusting a recipe from Australia again! First of all, apparently their version of a tablespoon is 20 mL, and the American version is 14.2 mL. Second, and most importantly, they have an ingredient called cornflour.

I thought I was being smart when I thought "cornflour" was Aussie for "cornstarch". Makes sense, no? No. Definitely not, especially when I tried to mix 30 g of cornstarch with 2 American tablespoons of water. Remember in science class when they taught you about liquids and solids? This one was a solid, and there was no way I was going to get 30 g of all-purpose flour to somehow join that party. I even added 1 more American tbsp of water to the mix, but to no avail.

After doing some research online, I found that Australian "cornflour" is some type of wheat product, because the British used to call wheat by the name "corn," and the Aussies call it maize. Wikipedia says Aussie "cornflour" is "wheaten starch." Thanks, Wikipedia. What's wheaten starch? Google doesn't seem to know, either. Maybe this ingredient just doesn't exist in the US?

Oh well, at least the extra grapefruit juice was good.

Ginger-Stewed Eggplant
(adapted from Washoku)
serves 4
4 Japanese eggplants, about 3 oz each
1/3 cup dashi
1 teaspoon sake
1 teaspoon sugar
1/2 teaspoon ginger juice, with peels reserved
1 tablespoon soy sauce
light-colored soy sauce, to taste
mirin, to taste
vegetable oil
  1. Cut each eggplant in half, lengthwise, and make shallow, parallel slits on the diagonal into the skin side of each half
  2. In a skillet, sear the eggplant, skin side down
  3. Flip the eggplant halves over so the skin is facing up, sear for another minute
  4. Add dashi, sake, sugar, and ginger peels, and lower the heat to maintain a simmer
  5. Cover with an otoshi-buta
  6. Cook for 2-3 minutes, or until liquid is reduced in half
  7. Add soy sauce and discard the ginger peels, simmer for another minute
  8. Add ginger juice and cook for another 30 seconds
  9. If necessary, adjust seasoning with soy sauce or mirin.
  10. Remove pan from heat, and let the eggplant cool in the pan, covered
  11. Serve at room temperature or chilled
Gingery Seared Pork
(adapted from Washoku)
Serves 4
12 ounces of pork loin, sliced thinly
2 teaspoons ginger juice
2 tbsp sake
1 1/2 tbsp soy sauce
3 bell peppers
vegetable oil
  1. Mix ginger juice and sake, and marinate pork for at least 20 min
  2. Add soy sauce to marinade 10-15 min before cooking
  3. Quickly sear pork on both sides over high heat, set aside
  4. Lower the heat and sear bell peppers, set aside
  5. Return the pork to the pan, along with any juices released. Sauté for 2 minutes, or until the surfaces are well glazed and slightly browned.
  6. Return the peppers to the pan and warm through.
  7. Serve immediately.

Saturday, February 16, 2008

V-day leftovers


After the Valentine's day meal, I had leftover kabocha squash and dashi left, so I found another recipe in the Washoku cookbook: Soy-Simmered Kabocha Squash with Minced Chicken (kabocha no tori an kaké).

I didn't have ground chicken, but I did my best impression of the guy behind the counter at a Mexican taquería and chopped the heck out of the chicken thigh I had in the freezer.

This recipe, as well as the previous kabocha recipe from V-day, used a technique unfamilar to me--using an otoshi-buta. An otoshi-buta is traditionally a wooden lid that's meant to rest on top of the food itself, instead of covering the pot. The purpose of this is to steam the food while simultaneously allowing the liquid to evaporate, concentrating the flavors. I don't have an otoshi-buta, so I used a lid from another pan to give the same effect. I think it worked pretty decently.

I served this with an extremely simple miso soup made from the rest of the leftover dashi and miso.


Soy-Simmered Kabocha Squash with Minced Chicken
(adapted from Washoku)
Serves 4

1/4 kabocha squash, cut into 12 beveled chunks with seeds removed but skin intact
1 1/2 cups Basic Sea Stock
1 tablespoon sake
2 teaspoons sugar
2 teaspoons soy sauce
3 oz ground chicken
1 tablespoon cornstarch mixed with 1 tablespoon cold water
1 scallion, finely chopped
salt, to taste
  1. Arrange squash pieces in a single layer, skin side down, in a pot.
  2. Add enough stock to cover the squash barely.
  3. Place an otoshi-buta over the squash and bring the stock to a boil over high heat
  4. Lower heat and simmer for 3 to 4 minutes, or until barely tender.
  5. Add sake and sugar and flip the squash so that the skin faces up
  6. Simmer for 2 more minutes.
  7. Add soy sauce and simmer for another 2 minutes.
  8. Transfer the squash to deep individual serving dishes.
To prepare chicken sauce
  1. Strain the remining liquid if it looks very fibrous.
  2. Add the remaining stock and bring to a simmer.
  3. Add the chicken, stirring well to break up any lumps.
  4. Season with salt if necessary.
  5. Pour cornstarch paste into the simmering chicken, and boil until the sauce thickens.
  6. Top each squash portion with the chicken sauce, and scatter scallions on top of each serving.

Monday, February 11, 2008

Valentine's Day

Valentine's day is coming up, and that's a real high pressure event for any guy. My wife and I actually celebrated an early V-day on Sunday, so the pressure is over for me! If any of you fellas are reading this, here is some advice that can turn this day into a culinary success.

Find out what she likes
Like most women, my wife appreciates flowers. Her favorite flowers are yellow roses, so I bought her a yellow rose. Other girls may like tulips or daisies, or non-floral stuff like candles, too. This will come in handy when setting the table.

What kind of food?
Does she like Italian food? Mexican? Chinese? This is important. You don't want to slave away in the kitchen for hours just to find out she doesn't even like the type of food. If you don't know, ask her (or her friends)! My wife's favorite cuisine is Japanese, so I was able to plan a menu around that.

Plan the menu
This is very important. Make sure you have at least one appetizer in addition to a main course. If your significant other has a sweet tooth, don't skimp on dessert! Think about what you plan to drink that night as well.

I flipped through the pages of Washoku: Recipes From The Japanese Home Kitchen and found two recipes I was sure she would enjoy: Lemon-Simmered Kabocha Squash (kabocha no sawayaka ni), and Miso-Marinated Broiled Black Cod (tara no misoyaki). I would also need to make rice to accompany this, and decided on green tea as the beverage. I opted for no dessert per my wife's request to keep it a light meal (you don't want to end up with food coma on Valentine's Day!).

Always read recipes a couple of days before the event--you never know what you may need to do beforehand.

Miso-Marinated Broiled Black Cod
(adapted from Washoku)
Serves 2

3/4 pounds black cod with skin intact, cut into 2 pieces
1 1/2 cups sweet, light miso
1/3 cup mirin
1 T yuzu peel, grated lemon or orange zest (optional)
Lemon or lime wedges (optional)

To prepare the fish/marinade:
1. Rinse the fish pieces under cold running water and pat dry.
2. To make the marinade, combine miso, mirin and yuzu peel in a medium-sized container and stir to mix well.
3. Push aside 2/3 of the marinade in the container. Lay a single piece of sarashi cloth (equivalent to two layers of cheese cloth, or you can make do with a paper towel as I did) so that half of it is on top of the marinade. Lay one of the fish pieces on the marinade-moistened cloth, and fold the remaining cloth over the fish to enclose it. Spread half of the remaining marinade on top of the cloth, and repeat the process with the second piece of fish. The last half of the marinade will go on top.
4. Place plastic wrap over the top of the fish "sandwich", pressing lightly to ensure even distribution of the marinade.
5. Marinate the fish at cool room temperature (no more than 75 F) for 6+ hours or in the fridge for up to 3 days.

To broil:
1. Preheat a broiler.
2. Scrape away the miso marinade and remove the fish from its cloth wrapping.
3. Place the fish pieces skin side up on a shallow broiler-safe pan and place in the broiler about 3 inches away from the heat source.
4. Broil for 3 to 4 minutes until skin begins to bubble, then flip the pieces.
5. Broil for another 2 to 3 minutes. The fish should be slightly crusty and golden on the surface and white on the inside.


Basic Sea Stock
(adapted from Washoku)
Makes about 1 quart

15 to 20 square inches kombu (dried kelp)
4 1/4 cups cold water, preferably filtered or spring water
1/2 cup loosely packed katsuo-bushi (dried bonito flakes)

1. Place kombu in a pot with the water. Soak for 10-15 minutes before placing the pot over medium heat.
2. Remove the pot from the heat when small bubbles begin to break on the surface and at the edge of the pot. Add the katsuo-bushi, scattering the flakes across the water. The flakes should begin to sink after a few minutes.
3. Within 3 to 4 minutes after adding the fish flakes, strain the stock through a sarashi cloth, or paper towel-lined strainer as I did. You're done!

Note: This stock must be used fresh; it loses its flavors when frozen. It will keep for 3-4 days in the fridge.


Lemon-Simmered Kabocha Squash
(adapted from Washoku)
Serves 2

1 cup Basic Sea Stock (above)
1 small lemon, zest removed and reserved, lemon juiced
2 T mirin
1/4 kabocha squash (10 oz), cut into 8 beveled chunks with seeds removed but skin intact
1 teaspoon light-colored soy sauce
1/2 teaspoon soy sauce
Lemon or lime slices for garnish, if serving chilled (optional)

1. Combine stock, lemon juice, and mirin in a pot wide enough to hold the squash pieces in a single layer.
2. Bring to a simmer over low heat, and skim away any froth.
3. Add the squash pieces, skin side down, in a snug single layer.
4. Place two layers of parchment paper over the squash, cut in a circle 1 inch smaller in diameter than your pan and weigh it down with a small lid from another pot.
5. Adjust the heat to maintain a steady (but not vigorous) simmer. Cook for 3-4 minutes, until barely tender. With a toothpick, you should be able to pierce the squash but still meet some resistance.
6. Flip the squash pieces over so the skin faces up. Replace the parchment and lid, and simmer for another 2 minutes. Test again with a toothpick; you should be able to pierce the skin without much difficulty, but the flesh shouldn't be so soft it crumbles.
7. Add the light-colored soy sauce, swirling the pan to make sure its evenly distributed, then simmer for another minute or two. The toothpick should meet no resistance now. Add the soy sauce, swirl again, and simmer for a final 30 to 40 seconds.
8. Remove the pan from heat and allow the squash to cool in the pan. When it's ready to be served, spoon the leftover liquid over the squash.

The game plan
This was actually the first time I cooked Japanese food, so there were quite a few ingredients I did not have, and techniques I have never used. I needed a game plan.

1 day ahead
Buy groceries
Marinate fish
Make sea stock (dashi)
Set the table

2 hours before
Make kabocha
Make rice

10 minutes before
Broil the fish

For most of the Japanese ingredients, I went to my local Japanese market, Nijiya. I was pleasantly surprised to see they actually had yuzu! I was going to use lemon zest for the fish marinade, but fresh yuzu zest is even better since it's more aromatic, and it's the authentic Japanese ingredient!


I finally had the ingredients and it was time to marinate. Now, I have never heard of a technique where the main ingredient wasn't touching the marinade (the recipe called for a layer of cloth between the fish and miso), and was worried that the miso flavor would not penetrate the fish. However, I stuck to the recipe, substituting a paper towel for the sarashi cloth. The other thing was that it seemed like it called for a heck of a lot of miso! But once again, I decided to trust the recipe. Once the fish was all wrapped up and covered in miso, I placed it into the refrigerator overnight, hoping the miso would somehow find its way through the paper towel and into the fish.

The sea stock, or dashi, was very easy to make. The only thing that didn't seem right was that the bonito flakes didn't sink into the water after 4 minutes. Maybe I didn't heat the water enough? It tasted okay though, so I saved it and put it in the fridge.

The day of, I made sure not to forget to make rice (I always forget that!), and I made the kabocha in advance, since it's supposed to be served at room temperature. The recipe called for bevelling all the corners off, so I did that dutifully, though I'm not sure what difference it made.

I had never made kabocha before, so I didn't really know how it was going to behave while cooking. I think I overcooked some of them, however, because some parts were quite dry and crumbly. Of course, I saved the best ones for my wife.


As soon as she came home (she was at a baking class), I took the fish out of the fridge and unwrapped the paper towel and miso. To my delight, the paper towel had become moist, and the surface of the fish had changed color, indicating to me that it had absorbed the miso!


I popped it in the oven for about seven minutes (making sure to flip it halfway). It looked really good coming out of the broiler. The skin was crispy and the surface was slightly charred. Garnished with a lemon wedge, it looked perfect. Hopefully my wife would think it tasted as good as it looked!